- Home
- Careers
- Contact
- About
-
Who we are and what we do. -
Press releases, announcements, and notable corporate information. -
We are looking for a few A people. -
We have over 40 years of innovation to create value for our customers. -
We aim to be the highest value provider of every product and service we offer. -
An easy guide to Probe fundamentals.
-
- Services
-
In additional to the analytical results we normally include an expert analysts summary.
We use our decades of experience to help you better understand your data. -
CleanAir can insures that the project goals and testing are objectives are met.
-
We can ship what you need today. It will work. You get a company of experts when you rent from CleanAir. - Thermal Performance
-
- Rental
-
Our factory reconditioning experts work to make old as good as new. -
CleanAir can provide the services required to care of your emissions measurement or power measurement instruments, no matter the age, model or manufacturer.
-
We deliver rental, emergency, or supplemental instruments and onsite services quickly, with minimal operational interruptions .
-
- Products
Featured Product

UL Listed Mobile Temporary Power
Look professional. Don't risk a OSHA fine, or worse causing your customer to get an OSHA or MSHA fine by using an unsafe mobile power distribution system. The CleanAir Temporary Power cart is UL listed! Read more... -
Reference
-
Overviews of products and services -
Learn about our companies and business -
Detailed technical information about the functioning of our products -
Guides and instructions on proper installation and service -
Guides and instructions on proper installation and service -
Drawings, configuration, materials, and limits useful for the planning and layout.
-
CleanAir's reference of video content -
Publications addressing an issue or topic
-
- Site Map
 Express
 FTIR
FTIR Mercury
 Emission Sampling Equipment
 Instrument Rental
EPA Methods List with Links
Method 316 - Sampling and Analysis for Formaldehyde Emissions from Stationary Sources in the Mineral Wool and Wool Fiberglass Industries
APPENDIX A TO PART 63--TEST METHOD
Content [ show/hide ].1.0 Introduction.
This method is applicable to the determination of formaldehyde, CAS Registry number 50-00-0, from stationary sources in the mineral wool and wool fiber glass industries. High purity water is used to collect the formaldehyde. The formaldehyde concentrations in the stack samples are determined using the modified pararosaniline method. Formaldehyde can be detected as low as 8.8 x 10⁻¹⁰ lbs/cu ft (11.3 ppbv) or as high as 1.8 x 10>-3 lbs/cu ft (23,000,000 ppbv), at standard conditions over a 1 hour sampling period, sampling approximately 30 cu ft.
2.0 Summary of Method.
Gaseous and particulate pollutants are withdrawn isokinetically from an emission source and are collected in high purity water. Formaldehyde present in the emissions is highly soluble in high purity water. The high purity water containing formaldehyde is then analyzed using the modified pararosaniline method. Formaldehyde in the sample reacts with acidic pararosaniline, and the sodium sulfite, forming a purple chromophore. The intensity of the purple color, measured spectrophotometrically, provides an accurate and precise measure of the formaldehyde concentration in the sample.
3.0 Definitions.
See the definitions in the General Provisions of this Subpart.
4.0 Interferences.
Sulfite and cyanide in solution interfere with the pararosaniline method. A procedure to overcome the interference by each compound has been described by Miksch, et al.
5.0 Safety. (Reserved)
6.0 Apparatus and Materials.
6.1 Sampling Train Schematic
A schematic of the sampling train is shown in Figure 1. This sampling train configuration is adapted from EPA Method 5, 40 CFR part 60, appendix A, procedures.
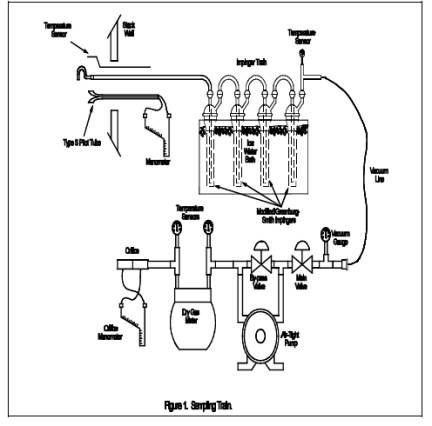
The sampling train consists of the following components: Probe probe nozzle, Probe liner, pitot tube, differential pressure gauge, impingers, metering system, barometer, and gas density determination equipment.
6.1.1 Probe probe nozzle
Quartz, glass, or stainless steel with sharp, tapered (30 angle) leading edge. The taper shall be on the outside to preserve a constant inner diameter. The probe nozzle shall be buttonhook or elbow design. A range of probe nozzle sizes suitable for isokinetic sampling should be available in increments of 0.15 cm (1/16 in), e.g., 0.32 to 1.27 cm (1/8 to 1/2 in), or larger if higher volume sampling trains are used. Each probe nozzle shall be calibrated according to the procedure outlined in Section 10.1.
6.1.2 Probe Liner
Borosilicate glass or quartz shall be used for the Probe liner. The Probe shall be maintained at a temperature of 120C ± 14C (248F ± 25F).
6.1.3 pitot Tube
The pitot tube shall be Type S, as described in Section 2.1 of EPA Method 2, 40 CFR part 60, appendix A, or any other appropriate device. The pitot tube shall be attached to the Probe to allow constant monitoring of the stack gas velocity. The impact (high pressure) opening plane of the pitot tube shall be even with or above the probe nozzle entry plane (see Figure 2-6b, EPA Method 2, 40 CFR part 60, appendix A) during sampling. The Type S pitot tube assembly shall have a known coefficient, determined as outlined in Section 4 of EPA Method 2, 40 CFR part 60, appendix A.
6.1.4 Differential Pressure Gauge
The differential pressure gauge shall be an inclined manometer or equivalent device as described in Section 2.2 of EPA Method 2, 40 CFR part 60, appendix A. One manometer shall be used for velocity-head reading and the other for orifice differential pressure readings.
6.1.5 impingers
The sampling train requires a minimum of four impingers, connected as shown in Figure 1, with ground glass (or equivalent) vacuum-tight fittings. For the first, third, and fourth impingers, use the Greenburg-Smith design, modified by replacing the tip with a 1.3 cm inside diameters (1/2 in) glass tube extending to 1.3 cm (1/2 in) from the bottom of the flask. For the second impinger, use a Greenburg-Smith impinger with the standard tip. Place a thermometer capable of measuring temperature to within 1C (2F) at the outlet of the fourth impinger for monitoring purposes.
6.1.6 metering System
The necessary components are a vacuum gauge, leak-free pump, thermometers capable of measuring temperatures within 3C (5.4F), dry-gas meter capable of measuring volume to within 1 percent, and related equipment as shown in Figure 1. At a minimum, the pump should be capable of 4 cfm free flow, and the console meter should have a recording capacity of 0-999.9 cu ft with a resolution of 0.005 cu ft. Other metering systems may be used which are capable of maintaining sample volumes to within 2 percent. The metering system may be used in conjunction with a pitot tube to enable checks of isokinetic sampling rates.
6.1.7 barometer
The barometer may be mercury, aneroid, or other barometer capable of measuring atmospheric pressure to within 2.5 mm Hg (0.1 in Hg). In many cases, the barometric reading may be obtained from a nearby National Weather Service Station, in which case the station value (which is the absolute barometric pressure) is requested and an adjustment for elevation differences between the weather station and sampling point is applied at a rate of minus 2.5 mm Hg (0.1 in Hg) per 30 m (100 ft) elevation increase (rate is plus 2.5 mm Hg per 30 m (100 ft) of elevation decrease).
6.1.8 Gas Density Determination equipment
Temperature Sensor and pressure gauge (as described in Sections 2.3 and 2.3 of EPA Method 2, 40 CFR part 60, appendix A), and gas analyzer, if necessary (as described in EPA Method 3, 40 CFR part 60, appendix A). The Temperature Sensor ideally should be permanently attached to the pitot tube or sampling Probe in a fixed configuration such that the top of the sensor extends beyond the leading edge of the Probe sheath and does not touch any metal. Alternatively, the sensor may be attached just prior to use in the field. Note, however, that if the Temperature Sensor is attached in the field, the sensor must be placed in an interference-free arrangement with respect to the Type S pitot openings (see Figure 2-7, EPA Method 2, 40 CFR part 60, appendix A). As a second alternative, if a difference of no more than 1 percent in the average velocity measurement is to be introduced, the temperature gauge need not be attached to the Probe or pitot tube.
6.2 Sample Recovery.
6.2.1 Probe Liner: Probe probe nozzle and brushes; bristle brushes with stainless steel wire handles are required. The Probe brush shall have extensions of stainless steel, TeflonTM, or inert material at least as long as the Probe. The brushes shall be properly sized and shaped to brush out the Probe liner, the Probe probe nozzle, and the impingers.
6.2.2 Wash Bottles: One wash bottle is required. Polyethylene, TeflonTM, or glass wash bottles may be used for sample recovery.
6.2.3 Graduated Cylinder and/or Balance: A graduated cylinder or balance is required to measure condensed water to the nearest 1 ml or 1 g. Graduated cylinders shall have division not > 2 ml. Laboratory balances capable of weighing to ± 0.5 g are required.
6.2.4 Polyethylene Storage Containers: 500 ml wide-mouth polyethylene bottles are required to store impinger water samples.
6.2.5 Rubber Policeman and Funnel: A rubber policeman and funnel are required to aid the transfer of material into and out of containers in the field.
6.3 Sample Analysis.
6.3.1 Spectrophotometer - B&L 70, 710, 2000, etc., or equivalent; 1 cm path-length cuvette holder.
6.3.2 Disposable polystyrene cuvettes, path-lengh 1 cm, volume of about 4.5 ml.
6.3.3 Pipettors - Fixed-volume Oxford pipet (250 l; 500 l; 1000 l); adjustable volume Oxford or equivalent pipettor 1-5 ml model, set to 2.50 ml.
6.3.4 Pipet tips for pipettors above.
6.3.5 Parafilm, 2 wide; cut into about 1" squares.
7.0 Reagents.
7.1 High purity water
All references to water in this method refer to high purity water (ASTM Type I water or equivalent). The water purity will dictate the lower limits of formaldehyde quantification.
7.2 Silica Gel
Silica gel shall be indicting type, 6-16 mesh. If the silica gel has been used previously, dry at 175C (350F) for 2 hours before using. New silica gel may be used as received. Alternatively, other types of desiccants (equivalent or better) may be used.
7.3 Crushed Ice
Quantities ranging from 10-50 lbs may be necessary during a sampling run, depending upon ambient temperature. Samples which have been taken must be stored and shipped cold; sufficient ice for this purpose must be allowed.
7.4 Quaternary ammonium compound stock solution
Prepare a stock solution of dodecyltrimethylammonium chloride (98 percent minimum assay, reagent grade) by dissolving 1.0 gram in 1000 ml water. This solution contains nominally 1000 g/ml quaternary ammonium compound, and is used as a biocide for some sources which are prone to microbial contamination.
7.5 Pararosaniline
Weigh 0.16 grams pararosaniline (free base; assay of 95 percent or greater, C.I. 42500; Sigma P7632 has been found to be acceptable) into a 100 ml flask. Exercise care, since pararosaniline is a dye and will stain. Using a wash bottle with high-purity water, rinse the walls of the flask. Add no more than 25 ml water. Then, carefully add 20 ml of concentrated hydrochloric acid to the flask. The flask will become warm after the addition of acid. Add a magnetic stir bar to the flask, cap, and place on a magnetic stirrer for approximately 4 hours. Then, add additional water so the total volume is 100 ml. This solution is stable for several months when stored tightly capped at room temperature.
7.6 Sodium sulfite
Weigh 0.10 grams anhydrous sodium sulfite into a 100 ml flask. Dilute to the mark with high purity water. Invert 15-20 times to mix and dissolve the sodium sulfite. This solution MUST BE PREPARED FRESH EVERY DAY.
7.7 Formaldehyde standard solution
Pipet exactly 2.70 ml of 37 percent formaldehyde solution into a 1000 ml volumetric flask which contains about 500 ml of high-purity water. Dilute to the mark with high-purity water. This solution contains nominally 1000 g/ml of formaldehyde, and is used to prepare the working formaldehyde standards. The exact formaldehyde concentration may be determined if needed by suitable modification of the sodium sulfite method (Reference: J.F. Walker, FORMALDEHYDE (Third Edition), 1964.). The 1000 g/ml formaldehyde stock solution is stable for at least a year if kept tightly closed, with the neck of the flask sealed with Parafilm. Store at room temperature.
7.8 Working formaldehyde standards
Pipet exactly 10.0 ml of the 1000 g/ml formaldehyde stock solution into a 100 ml volumetric flask which is about half full of high-purity water. Dilute to the mark with high-purity water, and invert 15-20 times to mix thoroughly. This solution contains nominally 100 g/ml formaldehyde. Prepare the working standards from this 100 g/ml standard solution and using the Oxford pipets:
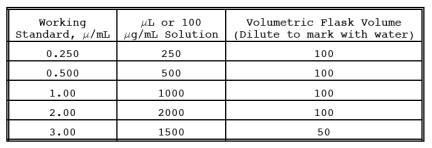
The 100 g/ml stock solution is stable for 4 weeks if kept refrigerated between analyses. The working standards (0.25 -3.00 g/ml) should be prepared fresh every day, consistent with good laboratory practice for trace analysis. If the laboratory water is not of sufficient purity, it may be necessary to prepare the working standards EVERY DAY. The laboratory MUST ESTABLISH that the working standards are stable - DO NOT assume that your working standards are stable for more than a day unless you have verified this by actual testing for several series of working standards.
8.0 Sample Collection.
8.1 Test Procedures
Because of the complexity of this method, field personnel should be trained in and experienced with the test procedures in order to obtain reliable results.
8.2 Laboratory Preparation
8.2.1 All the components shall be maintained and calibrated according to the procedure described in APTD-0576, unless otherwise specified.
8.2.2 Weigh several 200 to 300 g portions of silica gel in airtight containers to the nearest 0.5 g. Record on each container the total weight of the silica gel plus containers. As an alternative to preweighing the silica gel, it may instead be weighed directly in the impinger or sampling holder just prior to train assembly.
8.3 Preliminary Field Determinations.
8.3.1 Select the sampling site and the minimum number of sampling points according to EPA Method 1, 40 CFR part 60, appendix A, or other relevant criteria. Determine the stack pressure, temperature, and range of velocity heads using EPA Method 2, 40 CFR part 60, appendix A. A leak-check of the pitot lines according to Section 3.1 of EPA Method 2, 40 CFR part 60, appendix A, must be performed. Determine the stack gas moisture content using EPA Approximation Method 4,40 CFR part 60, appendix A, or its alternatives to establish estimates of isokinetic sampling rate settings. Determine the stack gas dry molecular weight, as described in EPA Method 2, 40 CFR part 60, appendix A, Section 3.6. If integrated EPA Method 3, 40 CFR part 60, appendix A, sampling is used for molecular weight determination, the integrated bag sample shall be taken simultaneously with, and for the same total length of time as, the sample run.
8.3.2 Select a probe nozzle size based on the range of velocity heads so that it is not necessary to change the probe nozzle size in order to maintain isokinetic sampling rates below 28 l/min (1.0 cfm). During the run do not change the probe nozzle. Ensure that the proper differential pressure gauge is chosen for the range of velocity heads encountered (see Section 2.2 of EPA Method 2, 40 CFR part 60, appendix A).
8.3.3 Select a suitable Probe liner and Probe length so that all traverse points can be sampled. For large stacks, to reduce the length of the Probe, consider sampling from opposite sides of the stack.
8.3.4 A minimum of 30 cu.ft. of sample volume is suggested for emission sources with stack concentrations not greater than 23,000,000 ppbv. Additional sample volume shall be collected as necessitated by the capacity of the water reagent and analytical detection limit constraint. Reduced sample volume may be collected as long as the final concentration of formaldehyde in the stack sample is greater than 10 (ten) times the detection limit.
8.3.5 Determine the total length of sampling time needed to obtain the identified minimum volume by comparing the anticipated average sampling rate with the volume requirement. Allocate the same time to all traverse points defined by EPA Method 1, 40 CFR part 60, appendix A. To avoid timekeeping errors, the length of time sampled at each traverse point should be an integer or an integer plus 0.5 min.
8.3.6 In some circumstances (e.g., batch cycles) it may be necessary to sample for shorter times at the traverse points and to obtain smaller gas-volume samples. In these cases, careful documentation must be maintained in order to allow accurate calculations of concentrations.
8.4 Preparation of Collection Train.
8.4.1 During preparation and assembly of the sampling train, keep all openings where contamination can occur covered with TeflonTM film or aluminum foil until just prior to assembly or until sampling is about to begin.
8.4.2 Place 100 ml of water in each of the first two impingers, and leave the third impinger empty. If additional capacity is required for high expected concentrations of formaldehyde in the stack gas, 200 ml of water per impinger may be used or additional impingers may be used for sampling. Transfer approximately 200 to 300 g of pre-weighed silica gel from its container to the fourth impinger. Care should be taken to ensure that the silica gel is not entrained and carried out from the impinger during sampling. Place the silica gel container in a clean place for later use in the sample recovery. Alternatively, the weight of the silica gel plus impinger may be determined to the nearest 0.5 g and recorded.
8.4.3 With a glass or quartz liner, install the selected probe nozzle using a Viton-A O-ring when stack temperatures are < 260C (500F) and a woven glass-fiber gasket when temperatures are higher. See APTD-0576 for details. Other connection systems utilizing either 316 stainless steel or TeflonTM ferrules may be used. Mark the Probe with heat-resistant tape or by some other method to denote the proper distance into the stack or duct for each sampling point.
8.4.4 Assemble the train as shown in Figure 1. During assembly, a very light coating of silicone grease may be used on ground-glass joints of the impingers, but the silicone grease should be limited to the outer portion (see APTD-0576) of the ground-glass joints to minimize silicone grease contamination. If necessary, TeflonTM tape may be used to seal leaks. Connect all Temperature Sensors to an appropriate potentiometer/display unit. Check all Temperature Sensors at ambient temperatures.
8.4.5 Place crushed ice all around the impingers.
8.4.6 Turn on and set the Probe heating system at the desired operating temperature. Allow time for the temperature to stabilize.
8.5 Leak-Check Procedures.
8.5.1 Pre-test Leak-check
Recommended, but not required. If the tester elects to conduct the pre-test leak-check, the following procedure shall be used.
8.5.1.1 After the sampling train has been assembled, turn on and set Probe heating system at the desired operating temperature. Allow time for the temperature to stabilize. If a Viton-a O-ring or other leak-free connection is used in assembling the Probe probe nozzle to the Probe liner, leak-check the train at the sampling site by plugging the probe nozzle and pulling a 381 mm Hg (15 in Hg) vacuum.
NOTE: A lower vacuum may be used, provided that the lower vacuum is not exceeded during the test. If a woven glass fiber gasket is used, do not connect the Probe to the train during the leak-check. Instead, leak check the train by first attaching a carbon-filled leak-check impinger to the inlet and then plugging the inlet and pulling a 381 mm Hg (15 in Hg) vacuum. (A lower vacuum may be used if this lower vacuum is not exceeded during the test.) Next connect the Probe to the train and leak-check at about 25 mm Hg (1 in Hg) vacuum. Alternatively, leak-check the Probe with the rest of the sampling train in one step at 381 mm Hg (15 in Hg) vacuum. Leakage rates in excess of (a) 4 percent of the average sampling rate or (b) 0.00057 m3/min (0.02 cfm), whichever is less, are unacceptable.
8.5.1.2 The following leak-check instructions for the sampling train described in APTD-0576 and APTD-0581 may be helpful. Start the pump with the fine-adjust valve fully open and coarse-valve completely closed. Partially open the coarse-adjust valve and slowly close the fine-adjust valve until the desired vacuum is reached. Do not reverse direction of the fine-adjust valve, as liquid will back up into the train. If the desired vacuum is exceeded, either perform the leak-check at this higher vacuum or end the leak-check, as described below, and start over.
8.5.1.3 When the leak-check is completed, first slowly remove the plug from the inlet to the Probe. When the vacuum drops to 127 mm (5 in) Hg or less, immediately close the coarse-adjust valve. Switch off the pumping system and reopen the fine-adjust valve. Do not reopen the fine-adjust valve until the coarse-adjust valve has been closed to prevent the liquid in the impingers from being forced backward in the sampling line and silica gel from being entrained backward into the third impinger.
8.5.2 Leak-checks During Sampling Run
8.5.2.1 If, during the sampling run, a component change (e.g., impinger) becomes necessary, a leak-check shall be conducted immediately after the interruption of sampling and before the change is made. The leak-check shall be done according to the procedure described in Section 10.3.3, except that it shall be done at a vacuum greater than or equal to the maximum value recorded up to that point in the test. If the leakage rate is found to be no greater than 0.0057 m3/min (0.02 cfm) or 4 percent of the average sampling rate (whichever is less), the results are acceptable. If a higher leakage rate is obtained, the tester must void the sampling run.
NOTE: Any correction of the sample volume by calculation reduces the integrity of the pollutant concentration data generated and must be avoided.
8.5.2.2 Immediately after component changes, leak-checks are optional. If performed, the procedure described in section 8.5.1.1 shall be used.
8.5.3 Post-test Leak-check
8.5.3.1 A leak-check is mandatory at the conclusion of each sampling run. The leak-check shall be done with the same procedures as the pre-test leak-check, except that the post-test leak-check shall be conducted at a vacuum greater than or equal to the maximum value reached during the sampling run. If the leakage rate is found to be no greater than 0.00057 m3/min (0.02 cfm) or 4 percent of the average sampling rate (whichever is less), the results are acceptable. If, however, a higher leakage rate is obtained, the tester shall record the leakage rate and void the sampling run.
8.6 Sampling Train Operation.
8.6.1 During the sampling run, maintain an isokinetic sampling rate to within 10 percent of true isokinetic, below 28 l/min (1.0 cfm). Maintain a temperature around the Probe of 120C ± 14C (248 ± 25F).
8.6.2 For each run, record the data on a data sheet such as the one shown in Figure 2. Be sure to record the initial dry-gas meter reading. Record the dry-gas meter
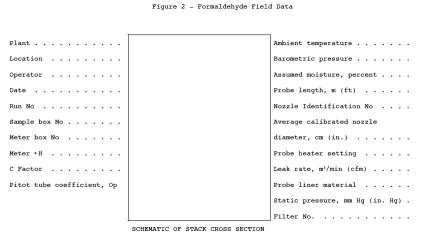
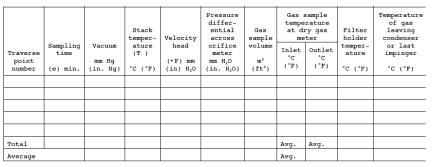
readings at the beginning and end of each sampling time increment, when changes in flow rates are made, before and after each leak-check, and when sampling is halted. Take other readings required by Figure 2 at least once at each sample point during each time increment and additional readings when significant adjustments (20 percent variation in velocity head readings) necessitate additional adjustments in flow rate. Level and zero the manometer. Because the manometer level and zero may drift due to vibrations and temperature changes, make periodic checks during the traverse.
8.6.3 Clean the stack access ports prior to the test run to eliminate the chance of sampling deposited material. To begin sampling, remove the probe nozzle cap, verify that the Probe heating system are at the specified temperature, and verify that the pitot tube and Probe are properly positioned. Position the probe nozzle at the first traverse point, with the tip pointing directly into the gas stream. Immediately start the pump and adjust the flow to isokinetic conditions. Nomographs, which aid in the rapid adjustment of the isokinetic sampling rate without excessive computations, are available. These nomographs are designed for use when the Type S pitot tube coefficient is 0.84 ± 0.02 and the stack gas equivalent density (dry molecular weight) is equal to 29 ± 4. APTD-0576 details the procedure for using the nomographs. If the stack gas molecular weight and the pitot tube coefficient are outside the above ranges, do not use the nomographs unless appropriate steps are taken to compensate for the deviations.
8.6.4 When the stack is under significant negative pressure (equivalent to the height of the impinger stem), take care to close the coarse-adjust valve before inserting the Probe into the stack in order to prevent liquid from backing up through the train. If necessary, a low vacuum on the train may have to be started prior to entering the stack.
8.6.5 When the Probe is in position, block off the openings around the Probe and stack access port to prevent unrepresentative dilution of the gas stream.
8.6.6 Traverse the stack cross section, as required by EPA Method 1, 40 CFR part 60, appendix A, being careful not to bump the Probe probe nozzle into the stack walls when sampling near the walls or when removing or inserting the Probe through the access port, in order to minimize the chance of extracting deposited material.
8.6.7 During the test run, make periodic adjustments to keep the temperature around the Probe at the proper levels. Add more ice and, if necessary, salt, to maintain a temperature of < 20C (68F) at the silica gel outlet.
8.6.8 A single train shall be used for the entire sampling run, except in cases where simultaneous sampling is required in two or more separate ducts or at two or more different locations within the same duct, or in cases where equipment failure necessitates a change of trains. An additional train or trains may also be used for sampling when the capacity of a single train is exceeded.
8.6.9 When two or more trains are used, separate analyses of components from each train shall be performed. If multiple trains have been used because the capacity of a single train would be exceeded, first impingers from each train may be combined, and second impingers from each train may be combined.
8.6.10 At the end of the sampling run, turn off the coarse-adjust valve, remove the Probe and probe nozzle from the stack, turn off the pump, record the final console meter reading, and conduct a post-test leak-check. Also, check the pitot lines as described in EPA Method 2, 40 CFR part 60, appendix A. The lines must pass this leak-check in order to validate the velocity-head data.
8.6.11 Calculate percent isokineticity (see Method 2) to determine whether the run was valid or another test should be made.
8.7 Sample Preservation and Handling.
8.7.1 Samples from most sources applicable to this method have acceptable holding times using normal handling practices (shipping samples iced, storing in refrigerator at 2C until analysis). However, forming section stacks and other sources using waste water sprays may be subject to microbial contamination. For these sources, a biocide (quaternary ammonium compound solution) may be added to collected samples to improve sample stability and method ruggedness.
8.7.2 Sample holding time: Samples should be analyzed within 14 days of collection. Samples must be refrigerated/kept cold for the entire period preceding analysis. After the samples have been brought to room temperature for analysis, any analyses needed should be performed on the same day. Repeated cycles of warming the samples to room temperature/refrigerating/rewarming, then analyzing again, etc., have not been investigated in depth to evaluate if analyte levels remain stable for all sources.
8.7.3 Additional studies will be performed to evaluate whether longer sample holding times are feasible for this method.
8.8 Sample Recovery.
8.8.1 Preparation:
8.8.1.1 Proper cleanup procedure begins as soon as the Probe is removed from the stack at the end of the sampling period. Allow the Probe to cool. When the Probe can be handled safely, wipe off all external particulate matter near the tip of the Probe probe nozzle and place a cap over the tip to prevent losing or gaining particulate matter. Do not cap the Probe tightly while the sampling train is cooling because a vacuum will be created, drawing liquid from the impingers back through the sampling train.
8.8.1.2 Before moving the sampling train to the cleanup site, remove the Probe from the sampling train and cap the open outlet, being careful not to lose any condensate that might be present. Remove the umbilical cord from the last impinger and cap the impinger. If a flexible line is used, let any condensed water or liquid drain into the impingers. Cap off any open impinger inlets and outlets. Ground glass stoppers, TeflonTM caps, or caps of other inert materials may be used to seal all openings.
8.8.1.3 Transfer the Probe and impinger assembly to an area that is clean and protected from wind so that the chances of contaminating or losing the sample are minimized.
8.8.1.4 Inspect the train before and during disassembly, and note any abnormal conditions.
8.8.1.5 Save a portion of the washing solution (high purity water) used for cleanup as a blank.
8.8.2 Sample Containers:
8.8.2.1 Container 1: Probe and impinger Catches. Using a graduated cylinder, measure to the nearest ml, and record the volume of the solution in the first three impingers. Alternatively, the solution may be weighed to the nearest 0.5 g. Include any condensate in the Probe in this determination. Transfer the combined impinger solution from the graduated cylinder into the polyethylene bottle. Taking care that dust on the outside of the Probe or other exterior surfaces does not get into the sample, clean all surfaces to which the sample is exposed (including the Probe probe nozzle, Probe fitting, Probe liner, first three impingers, and impinger connectors) with water. Use less than 400 ml for the entire waste (250 ml would be better, if possible). Add the rinse water to the sample container.
8.8.2.1.1 Carefully remove the Probe probe nozzle and rinse the inside surface with water from a wash bottle. Brush with a bristle brush and rinse until the rinse shows no visible particles, after which make a final rinse of the inside surface. Brush and rinse the inside parts of the Swagelok (or equivalent) fitting with water in a similar way.
8.8.2.1.2 Rinse the Probe liner with water. While squirting the water into the upper end of the Probe, tilt and rotate the Probe so that all inside surfaces will be wetted with water. Let the water drain from the lower end into the sample container. The tester may use a funnel (glass or polyethylene) to aid in transferring the liquid washes to the container. Follow the rinse with a bristle brush. Hold the Probe in an inclined position, and squirt water into the upper end as the Probe brush is being pushed with a twisting action through the Probe. Hold the sample container underneath the lower end of the Probe, and catch any water and particulate matter that is brushed from the Probe. Run the brush through the Probe three times or more. Rinse the brush with water and quantitatively collect these washings in the sample container. After the brushing, make a final rinse of the Probe as describe above.
NOTE: Two people should clean the Probe in order to minimize sample losses. Between sampling runs, brushes must be kept clean and free from contamination.
8.8.2.1.3 Rinse the inside surface of each of the first three impingers (and connecting tubing) three separate times. Use a small portion of water for each rinse, and brush each surface to which the sample is exposed with a bristle brush to ensure recovery of fine particulate matter. Make a final rinse of each surface and of the brush, using water.
8.8.2.1.4 After all water washing and particulate matter have been collected in the sample container, tighten the lid so the sample will not leak out when the container is shipped to the laboratory. Mark the height of the fluid level to determine whether leakage occurs during transport. Label the container clearly to identify its contents.
8.8.2.1.5 If the first two impingers are to be analyzed separately to check for breakthrough, separate the contents and rinses of the two impingers into individual containers. Care must be taken to avoid physical carryover from the first impinger to the second. Any physical carryover of collected moisture into the second impinger will invalidate a breakthrough assessment.
8.8.2.2 Container 2: Sample Blank. Prepare a blank by using a polyethylene container and adding a volume of water equal to the total volume in Container 1. Process the blank in the same manner as Container 1.
8.8.2.3 Container 3: Silica Gel. Note the color of the indicating silica gel to determine whether it has been completely spent and make a notation of its condition. The impinger containing the silica gel may be used as a sample transport container with both ends sealed with tightly fitting caps or plugs. Ground-glass stoppers or TeflonTM caps maybe used. The silica gel impinger should then be labeled, covered with aluminum foil, and packaged on ice for transport to the laboratory. If the silica gel is removed from the impinger, the tester may use a funnel to pour the silica gel and a rubber policeman to remove the silica gel from the impinger. It is not necessary to remove the small amount of dust particles that may adhere to the impinger wall and are difficult to remove. Since the gain in weight is to be used for moisture calculations, do not use water or other liquids to transfer the silica gel. If a balance is available in the field, the spent silica gel (or silica gel plus impinger) may be weighed to the nearest 0.5 g.
8.8.2.4 Sample containers should be placed in a cooler, cooled by (although not in contact with) ice. Putting sample bottles in Zip-LockTM bags can aid in maintaining the integrity of the sample labels. Sample containers should be placed vertically to avoid leakage during shipment. Samples should be cooled during shipment so they will be received cold at the laboratory. It is critical that samples be chilled immediately after recovery. If the source is susceptible to microbial contamination from wash water (e.g. forming section stack), add biocide as directed in section 8.2.5.
8.8.2.5 A quaternary ammonium compound can be used as a biocide to stabilize samples against microbial degradation following collection. Using the stock quaternary ammonium compound (QAC) solution; add 2.5 ml QAC solution for every 100 ml of recovered sample volume (estimate of volume is satisfactory) immediately after collection. The total volume of QAC solution must be accurately known and recorded, to correct for any dilution caused by the QAC solution addition.
8.8.3 Sample Preparation for Analysis
8.8.3.1 The sample should be refrigerated if the analysis will not be performed on the day of sampling. Allow the sample to warm at room temperature for about two hours (if it has been refrigerated) prior to analyzing.
8.8.3.2 Analyze the sample by the pararosaniline method, as described in Section 11. If the color-developed sample has an absorbance above the highest standard, a suitable dilution in high purity water should be prepared and analyzed.
9.0 Quality Control.
9.1 Sampling
See EPA Manual 600/4-77-02b for Method 5 quality control.
9.2 Analysis
The quality assurance program required for this method includes the analysis of the field and method blanks, and procedure validations. The positive identification and quantitation of formaldehyde are dependent on the integrity of the samples received and the precision and accuracy of the analytical methodology. Quality assurance procedures for this method are designed to monitor the performance of the analytical methodology and to provide the required information to take corrective action if problems are observed in laboratory operations or in field sampling activities.
9.2.1 Field Blanks
Field blanks must be submitted with the samples collected at each sampling site. The field blanks include the sample bottles containing aliquots of sample recover water, and water reagent. At a minimum, one complete sampling train will be assembled in the field staging area, taken to the sampling area, and leak-checked at the beginning and end of the testing (or for the same total number of times as the actual sampling train). The Probe of the blank train must be heated during the sample test. The train will be recovered as if it were an actual test sample. No gaseous sample will be passed through the blank sampling train.
9.2.2 Blank Correction
The field blank formaldehyde concentrations will be subtracted from the appropriate sample formaldehyde concentrations. Blank formaldehyde concentrations above 0.25 g/ml should be considered suspect, and subtraction from the sample formaldehyde concentrations should be performed in a manner acceptable to the Administrator.
9.2.3 Method Blanks
A method blank must be prepared for each set of analytical operations, to evaluate contamination and artifacts that can be derived from glassware, reagents, and sample handling in the laboratory.
10.0 Calibration.
10.1 Probe probe nozzle
Probe probe nozzles shall be calibrated before their initial use in the field. Using a micrometer, measure the inside diameter of the probe nozzle to the nearest 0.025 mm (0.001 in). Make measurements at three separate places across the diameter and obtain the average of the measurements. The difference between the high and low numbers shall not exceed 0.1 mm (0.004 in). When the probe nozzle becomes nicked or corroded, it shall be repaired and calibrated, or replaced with a calibrated probe nozzle before use. Each probe nozzle must be permanently and uniquely identified.
10.2 pitot Tube
The Type S pitot tube assembly shall be calibrated according to the procedure outlined in Section 4 of EPA Method 2, or assigned a nominal coefficient of 0.84 if it is not visibly nicked or corroded and if it meets design and inter-component spacing specifications.
10.3 metering System.
10.3.1 Before its initial use in the field, the metering system shall be calibrated according to the procedure outlined in APTD-0576. Instead of physically adjusting the dry-gas meter dial readings to correspond to the wet-test meter readings, calibration factors may be used to correct the gas meter dial readings mathematically to the proper values. Before calibrating the metering system, it is suggested that a leak-check be conducted. For metering systems having diaphragm pumps, the normal leak-check procedure will not delete leakages with the pump. For these cases, the following leak-check procedure will apply: make a ten-minute calibration run at 0.00057 m3/min (0.02 cfm). At the end of the run, take the difference of the measured wet-test and dry-gas meter volumes and divide the difference by 10 to get the leak rate. The leak rate should not exceed 0.00057 m3/min (0.02 cfm).
10.3.2 After each field use, check the calibration of the metering system by performing three calibration runs at a single intermediate orifice setting (based on the previous field test). Set the vacuum at the maximum value reached during the test series. To adjust the vacuum, insert a valve between the wet-test meter and the inlet of the metering system. Calculate the average value of the calibration factor. If the calibration has changed by more than 5 percent, recalibrate the meter over the full range of orifice settings, as outlined in APTD-0576.
10.3.3 Leak-check of metering system: The portion of the sampling train from the pump to the orifice meter (see Figure 1) should be leak-checked prior to initial use and after each shipment. Leakage after the pump will result in less volume being recorded than is actually sampled. Use the following procedure: Close the main valve on the meter box. Insert a one-hole rubber stopper with rubber tubing attached into the orifice exhaust pipe. Disconnect and vent the low side of the orifice manometer. Close off the low side orifice tap. Pressurize the system to 13 - 18 cm (5 - 7 in) water column by blowing into the rubber tubing. Pinch off the tubing and observe the manometer for 1 min. A loss of pressure on the manometer indicates a leak in the meter box. Leaks must be corrected.
NOTE: If the dry-gas meter coefficient values obtained before and after a test series differ by > 5 percent, either the test series must be voided or calculations for test series must be performed using whichever meter coefficient value (i.e., before or after) gives the lower value of total sample volume.
10.4 Probe Heater
The Probe heating system must be calibrated before its initial use in the field according to the procedure outlined in APTD-0576. Probes constructed according to APTD-0581 need not be calibrated if the calibration curves in APTD-0576 are used.
10.5 temperature gauges
Use the procedure in section 4.3 of USEPA Method 2 to calibrate in-stack temperature gauges. Dial thermometers such as are used for the console meter and condenser outlet, shall be calibrated against mercury-in-glass thermometers.
10.6 barometer
Adjust the barometer initially and before each test series to agree to within ± 2.5 mm Hg (0.1 in Hg) of the mercury barometer. Alternately, if a National Weather Service Station (NWSS) is located at the same altitude above sea level as the test site, the barometric pressure reported by the NWSS may be used.
10.7 Balance
Calibrate the balance before each test series, using Class S standard weights. The weights must be within ± 0.5 percent of the standards, or the balance must be adjusted to meet these limits.
11.0 Procedure for Analysis.
The working formaldehyde standards (0.25, 0.50, 1.0, 2.0, and 3.0 g/ml) are analyzed and a calibration curve is calculated for each day's analysis. The standards should be analyzed first to ensure that the method is working properly prior to analyzing the samples. In addition, a sample of the high-purity water should also be analyzed and used as a "0" formaldehyde standard. The procedure for analysis of samples and standards is identical: Using the pipet set to 2.50 ml, pipet 2.50 ml of the solution to be analyzed into a polystyrene cuvette. Using the 250 l pipet, pipet 250 l of the pararosaniline reagent solution into the cuvette. Seal the top of the cuvette with a Parafilm square and shake at least 30 seconds to ensure the solution in the cuvette is well-mixed. Peel back a corner of the Parafilm so the next reagent can be added. Using the 250 l pipet, pipet 250 l of the sodium sulfite reagent solution into the cuvette. Reseal the cuvette with the Parafilm, and again shake for about 30 seconds to mix the solution in the cuvette. Record the time of addition of the sodium sulfite and let the color develop at room temperature for 60 minutes. Set the spectrophotometer to 570 nm and set to read in Absorbance Units. The spectrophotometer should be equipped with a holder for the 1-cm pathlength cuvettes. Place cuvette(s) containing high-purity water in the spectrophotometer and adjust to read 0.000 AU. After the 60 minutes color development period, read the standard and samples in the spectrophotometer. Record the absorbance reading for each cuvette. The calibration curve is calculated by linear regression, with the formaldehyde concentration as the "x" coordinate of the pair, and the absorbance reading as the "y" coordinate. The procedure is very reproducible, and typically will yield values similar to these for the calibration curve:
Correlation Coefficient: 0.9999
Slope: 0.50
Y-Intercept: 0.090
The formaldehyde concentration of the samples can be found by using the trend-line feature of the calculator or computer program used for the linear regression. For example, the TI-55 calculators use the "X" key (this gives the predicted formaldehyde concentration for the value of the absorbance you key in for the sample). Multiply the formaldehyde concentration from the sample by the dilution factor, if any, for the sample to give the formaldehyde concentration of the original, undiluted, sample (units will be micrograms/ml).
11.1 Notes on the Pararosaniline Procedure
11.1.1 The pararosaniline method is temperature-sensitive. However, the small fluctuations
typical of a laboratory will not significantly affect the results.
11.1.2 The calibration curve is linear to beyond 4 g/ml formaldehyde, however, a research-grade spectrophotometer is required to reproducibly read the high absorbance values. Consult your instrument manual to evaluate the capability of the spectrophotometer.
11.1.3 The quality of the laboratory water used to prepare standards and make dilutions is critical. It is important that the cautions given in the Reagents section be observed. This procedure allows quantitation of formaldehyde at very low levels, and thus it is imperative to avoid contamination from other sources of formaldehyde and to exercise the degree of care required for trace analyses.
11.1.4 The analyst should become familiar with the operation of the Oxford or equivalent pipettors before using them for an analysis. Follow the instructions of the manufacturer; one can pipet water into a tared container on any analytical balance to check pipet accuracy and precision. This will also establish if the proper technique is being used. Always use a new tip for each pipetting operation.
11.1.5 This procedure follows the recommendations of ASTM Standard Guide D 3614, reading all solutions versus water in the reference cell. This allows the absorbance of the blank to be tracked on a daily basis. Refer to ASTM D 3614 for more information.
12.0 Calculations.
Carry out calculations, retaining at least one extra decimal figure beyond that of the acquired data. Round off figures after final calculations.
12.1 Calculations of Total Formaldehyde.
12.1.1 To determine the total formaldehyde in mg, use the following equation if biocide was not used: Total mg formaldehyde =

where:

12.1.2 To determine the total formaldehyde in mg, use the following equation if biocide was used: Total mg formaldehyde =
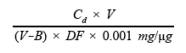
where:
12.2 Formaldehyde concentration (mg/m3) in stack gas. Determine the formaldehyde concentration (mg/m3) in the stack gas using the following equation:
Formaldehyde concentration (mg/m3) =
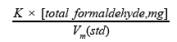
where:
12.3 Average console meter temperature and average orifice pressure drop are obtained from the data sheet.
12.4 Dry Gas Volume: Calculate Vm(std) and adjust for leakage, if necessary, using the equation in Section 6.3 of EPA Method 5, 40 CFR part 60, appendix A.
12.5 Volume of Water Vapor and Moisture Content: Calculated the volume of water vapor and moisture content from equations 5-2 and 5-3 of EPA Method 5.
13.0 Method Performance.
The precision of this method is estimated to be better than ± 5 percent, expressed as ± the percent relative standard deviation.
14.0 Pollution Prevention. (Reserved)
15.0 Waste Management. (Reserved)
16.0 References.
R.R. Miksch, et al., ANALYTICAL CHEMISTRY, November 1981, 53 pp. 2118-2123.
J.F. Walker, FORMALDEHYDE, Third Edition, 1964.
US EPA 40 CFR, Part 60, Appendix A, Test Methods 1-5
- Analytical
- Ion Chromatography
- Gas Chromatography
- Gravimetrics
- Ash Resistivity
- Inks/Coatings
- Scrubber Stoichiometry
- Titrations
- Mercury Sorbent Trap
- Engineering
- Express Products
- Rental Instruments
- MET80 Mercury Monitor
- Continuous Emission Monitors
- Gas Sampling Equipment
- Mobile Power Supply
Our Resources
- Technical Resources